Table of Contents
Customizing your FastManager Setup
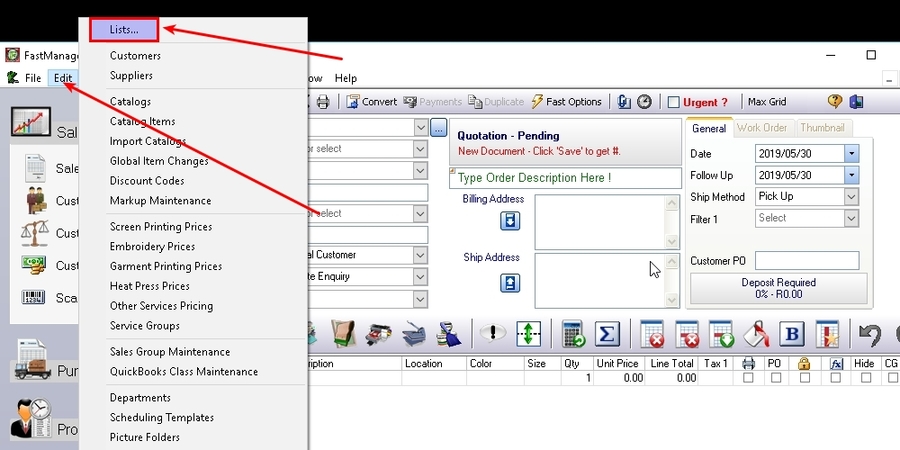
Lists
In many areas of FastManager you need to select from a list of options. You can customize many of these lists
Lists include:
- Customer Areas
- Customer Groups
- Customer Origination
- Optional Sales Order Filter
- Embellishment Locations
- Work Order Status
- Shipping Methods
- Ink Colors
- Ink Types
- Mesh Counts
- Screen Numbers
- Screen Tensions
- Thread Colors
- Thread Types
- Custom Sales Order Line Colors.
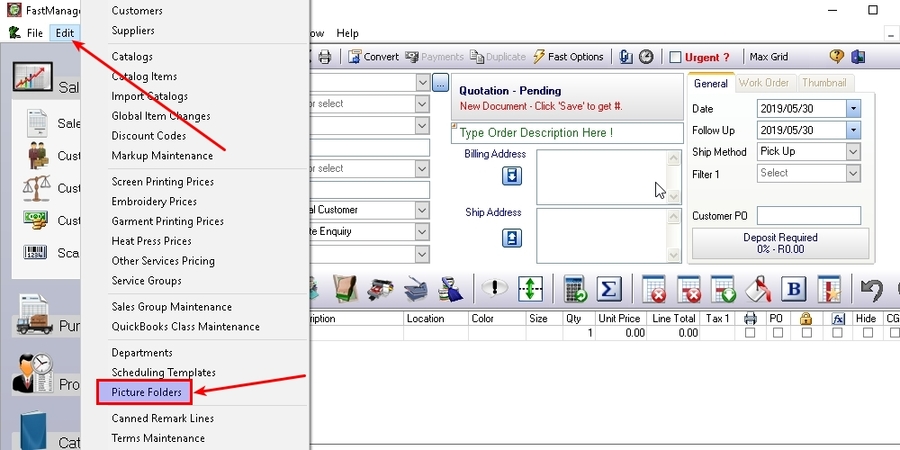
To create or edit these lists, select Lists from the Edit menu.
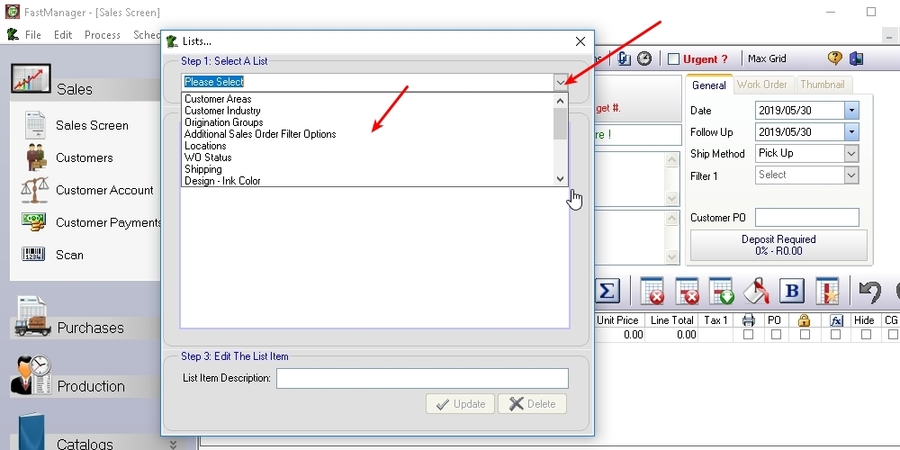
Select the list that you want to edit from the drop down list.
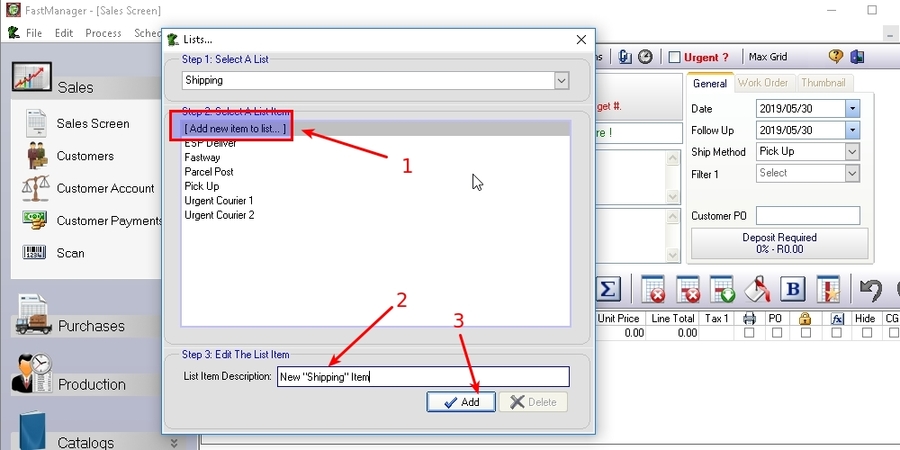
To add a new item to the list click on Add New Item To List.
- Enter the new item description at the bottom of the screen and click on the Add button.
To edit an existing item, click on the item that you want to edit in the list above.
- Change the description field below and click on
Update.- You can delete the list item by clicking on
Delete.
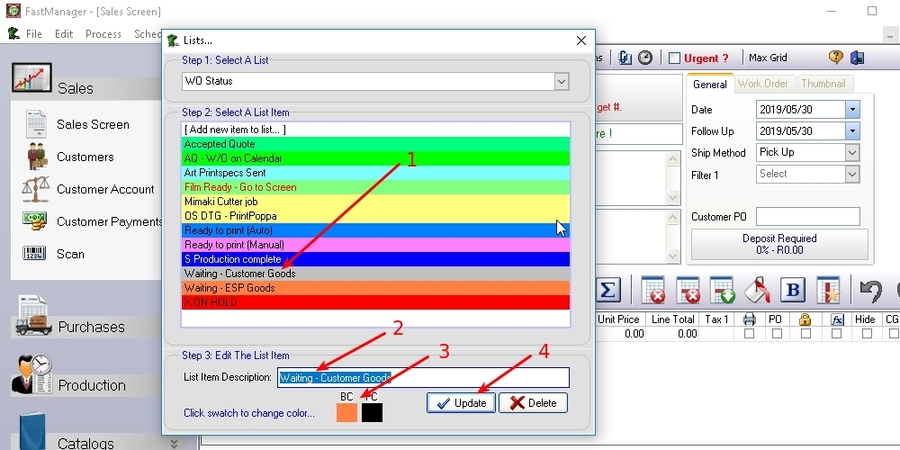
- Simply click on the color swatch under
BC(background color) orFC(foreground color) and select an alternative color.
Picture Folders
FastManager can create thumbnail images for each embellishment which will then print on the design detail reports as well as show up on certain screens.
- It does not link to these files. In fact it will re-size and save a copy of the picture file as a .bmp file when you load a picture file into your design detail area.
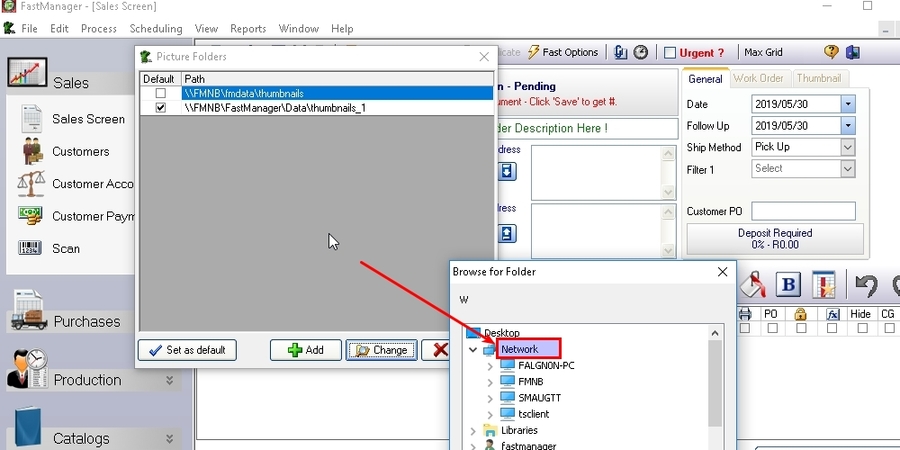
You need to tell FastManager where to create the thumbnail images.
- Go to:
Edit→Picture Folders
- You are able to create multiple picture folders. This is to prevent too many picture files in a single folder.
- FastManager will always create all new thumbnail pictures in the default pictures folder
- previous orders will continue to reference the location entry that was in use before
the pictures folder must be located in a shared location so everyone on the network can have access to it.
Of course your existing FastManager Data Folder is the logical obvious choice
New Pictures Folder
To add a new folder. Click on Add and select the location of the new folder.
Move Pictures Folder
If you moved your data to another location you will have to tell FastManager the new location of your existing folders. To do that, click on the Change button.
- Now browse to the new location that the thumbnail pictures were moved to.
we strongly recommend that you go through
Network --> (instead of, say, a mapped network drive) This is to ensure that all the users will be able to “reach” that location from FastManager.
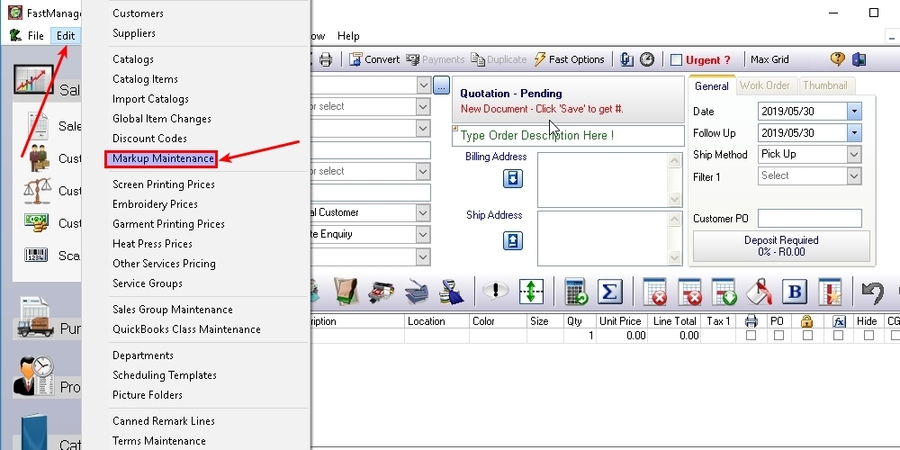
Markup Maintenance
FastManager allows you to create an unlimited number of markup tables.
- You can then apply these markup tables:
- when creating catalog items
- when adding a temporary item in the sales screen
- when importing catalogs
- You can also apply a markup table to multiple catalog items at the same time using the
Global Item Changesscreen. - You can create different markup tables which will be based on the cost of an item.
- For example, you would most likely have a different markup table for items costing $3, such as a Tee, than you would for an item costing you $30 such as a jacket.
- So you can create different levels of markup tables such as Level 3 up to level 30, where the number would represent the cost of the item.
- You can go to town on this one, and create as many different tables as you want.
- Then using the wizard in the global item changes you can automatically assign each markup table to an item based on it's average cost.
To access the markup maintenance screen, select Markup Maintenance from the Edit menu
To create a new markup simply start by typing in the first markup percentage (after giving your table a name).
For example. If you want to double up on the cost of an item if a customer orders 0 - 11 items enter 100 under the Markup column.
- This will add a 100% markup to the cost of the item
- Example: if the items cost
$3.00and you add a markup100%you will add$3.00to the existing cost of$3.00thus selling the item for a total of$6.00 - If you enter a quantity or markup in the last row of the grid, then FastManager will automatically add another row for you to enter the next price break.
- FastManager currently allows up to 8 price breaks in a single table.
Sales Groups
Every line item that is added to an order on the sales screen is linked to a Sales Group.
- The Sales Group is important if you want a sales report that will break down your sales based on it's sales group.
- The Sales Group will also determine which item code is selected when exporting the line item to QuickBooks:
- in the Integrator setup, you will link each FastManager sales group to a corresponding line item in Quickbooks
For more information on how to setup your embellishment priclelists & additional charges, see: Pricing
To customize the list of sales groups, go to: Edit -> Sales Group Maintenance.
- To create a new Sales Group click on the
Newbutton - To edit an existing group, select the group that you want to edit and click on the
Editbutton - To delete an existing group, select the group that you want to delete and click on the
Deletebutton.
These sales groups must exist as they are automatically associated with items in the catalogs that you can import.
When creating a new Sales Group, or editing an existing one, enter the following information:
- The sales group description (this is the name of the Sales Group)
- The QuickBooks item codes.(Optional, can be setup through the Integrator later)
- These are the line item codes that QuickBooks will use to substitute when sending invoices or purchase orders to QuickBooks.
- Click
Saveto commit your changes. - You can also click
Save and Newto immediately create the next item.
Taxes
You need to tell FastManager how you want to apply sales tax.
- FastManager also makes provision for an additional tax such as State tax.
In other words
Tax On Tax.
In this scenario, we will assume that you only charge 1 tax.
From the Edit menu select Tax Maintenance.
- You can add as many tax types as you wish. This is very helpful if you need to charge different tax percentages to different customers.
- To edit an existing tax item's percentage, click on the Open button and select the tax item to you want to edit.
- To add a new tax item, click on the New button and enter a user friendly description and tax percentage.
- Click Save to commit your changes.
Now we need to tell FastManager what our default tax percentages will be.
- Even though you may charge different tax percentages to different customers, you should select a default percentage.
- You can always change the tax percentage on the fly on every Quotation, Work Order or Invoice.
- To change the selected default tax item, you will need to go back to the Preferences screen.
Departments
In FastManager you can assign and schedule tasks to various departments.
- You can have FastManager automatically assign these tasks by turning on and setting up the Auto Scheduling module.
- You can also manually assign tasks to different departments
From the Edit menu select Departments
- To edit an existing department, click on
Openand select the department that you want to edit. - To create a new department click on
New.
Remember to click on Save to commit any changes you have made.
If you are manually assigning tasks to these departments, you can tell FastManager what you want the default date to be at the time of assigning the tasks.
- For example, you can specify digitizing to be done one or 2 days before the “Schedule Date” (machine run date).
Substitute Departments
If you have more than one department that does the same thing, you can specify the other one to be a substitue for this one, so that if this department is full up on a given day, it is easier to switch the task to the other department
Scheduling Templates
Scheduling templates can save you time by assigning multiple tasks with just 2 clicks
- From the
Editmenu selectScheduling Templates
- To create a new template click on the
Newbutton (in the middle), enter a short description e.g. 'Names and Numbers' and clickOK.
- To edit a different (existing) template, select the template from the drop down list.
- To remove an existing template, select the template from the drop-down list, then click on the Delete Button
- On the left side you will see a list of all available departments.
- On the right you will see all the departments that you have selected to include in this group.
- To add a new department to the group, simply click on the department that you want to add in the left list.
- Then click on the
>(add to group) button.
- To remove a department from the group, simply select the department you want to remove, in the list on your right and click on the
<(remove from group) button.
^ or Move Down v buttons.
When you are done click on Save to commit your changes.
You will now be able to use this template to assign multiple tasks to a job. For more info see: Production - Scheduling With Templates
Discount Codes
When entering and pricing catalog items you can select to have FastManager calculate the cost based on a Discount Code.
- This is very typical for the ASI industry in the US.
To open the discount code maintenance screen, select Discount Codes from the Edit menu.
- You will see this screen:
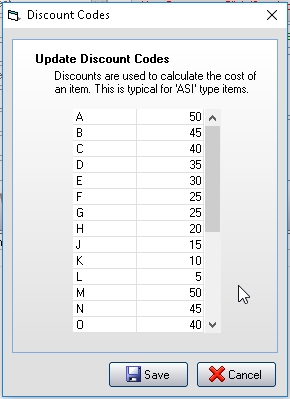
- Update the different discount percentages as per the industry and click
Save
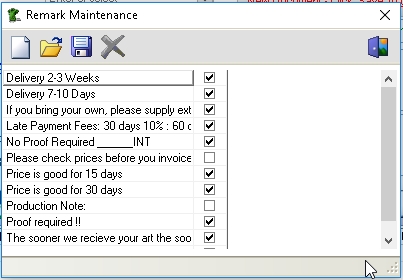
Canned Remark Lines
You can create canned (“predefined”) remark lines to avoid repetitive typing, which you can use the on sales screen.
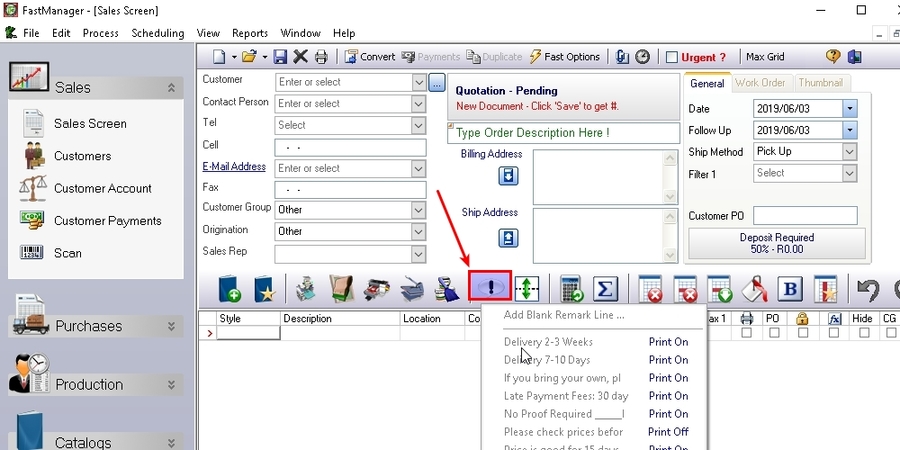
From the Edit menu, select Canned Remark Lines
- To edit or delete and existing item, first open the item by clicking on the
Openbutton. - You can click on the
Savebutton to commit you changes, or click on theDeletebutton to delete the canned remark line. - To create a new canned remark line, click on the
Newbutton.
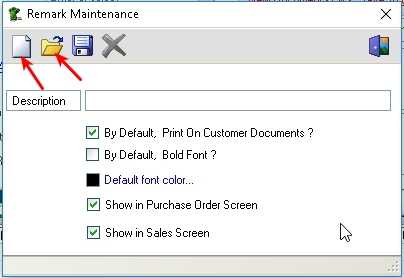
- Select if you want to print the remark line on customer documents or not.
- You can also color code, and bold line items.
- Select if you want the canned remark to show up as an option on either the Purchase Order screen or the Sales Screen
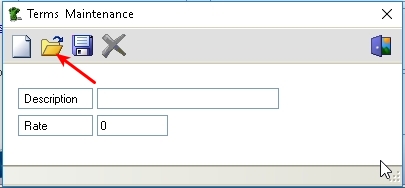
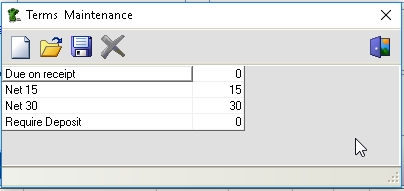
Terms
You can assign payment terms to a customer. These terms will print on customer documents such as quotations, sales orders and invoices.
- The terms that you apply will also determine if a customer's account is current or past due.
- The applied terms of a customer will export to QuickBooks along with the invoice if you are integrating with QuickBooks.
To customize your terms list, select Terms from the Edit menu.
- To edit or delete and existing record, you would need to first open the record, by clicking on the
Openbutton. - Then click on the
Savebutton to commit your changes or click on theDeletebutton to delete the record. - To create a new record, click on the
Newbutton. - You can enter a user friendly description such as 'Due on Receipt' as well as the number of days.
- FastManager will use the number of days to determine if an invoice is pas due.
- If you are going to export your invoices to QuickBooks it would be very wise to match your terms list exactly to that of your QuickBooks data.
Payment Methods
You can customize the different payment methods in FastManager.
- From the
Editmenu selectPayment Methods

- To edit or delete an existing record, you would need to open that record first by clicking on the Open button
- Then click Save to commit your changes or, click Delete to permanently delete the record from your database.
- FastManager will not allow you to delete a payment method, if you have actual payments in your receivables register linked to this record.
- You can
Hidethe record instead. - To add a new record click on the New button.

Refund Methods
Every now and then you may have to issue a refund to a customer. You need to tell FastManager how you processed the refund.
- You can then periodically print a report on all the refunds you made.
To edit the various refund methods, select Refund Methods from the Edit menu.
- To edit or delete an existing record you would need to open the record first, by clicking on the
Openbutton, and then selecting the record you want to edit or delete. - Then click
Saveto commit your changes orX(Delete) to delete the record.
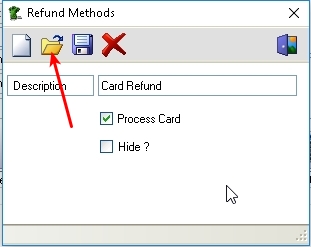
You would need to hide the record instead.
However
This is only useful if your card payments are processed through an integrated payment processor
Journal Types
Every now and then you might need to adjust your customer's balance without processing a payment or an invoice.
- For example interest charges, payment discounts etc.
You can do that by processing a customer journal entry which will either increase or decrease your customer's balance. In FastManager you can create a variety of your own journal types (in addition to the default standard journal types that are already configured)
To view, edit or create types of journals, go to:Edit –> Journal Types
- You will see the following screen.
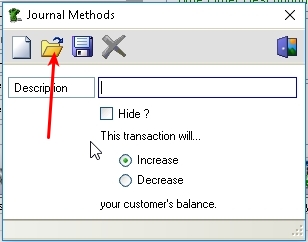
To create a new journal type, enter a user friendly description e.g. Interest Charges or Bad Debt
- Then select if this transaction will increase or decrease your customer's balance.
- Click
Save - You will now see the new journal type added to the drop down list when processing customer journals
You would need to hide it instead.
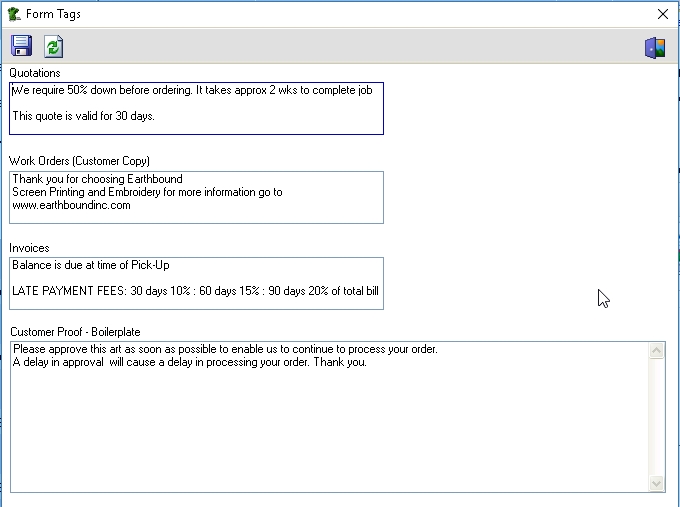
Form Tags
In FastManager there is some basic text that will appear at the bottom of certain customer documents such as Quotations, Sales Orders, Invoices and Customer Proofs.
These are called form tags.
255
Form Layouts
Customizing Forms
The following forms in FastManager can be customized by FastManager for a fee (Limitations Apply)
- Quotations
- Work Orders
- Invoices
- Packing Slip
- Customer Proof
Online Forms
You can also import forms from our existing online templates.
To import from our online forms,go to: Edit -> Forms
Click on the Search Online button.
- FastManager will download a list of available online forms from our web site.
Select the form you want to import and click on the Import button.
- You will now see a preview of the form.
- Select the form to be updated from the drop-down selection next to
Layout Type.- For example, if you downloaded the
Quotation with no discount, selectQuotation No Discountfrom the drop down list.
- Click on the
Savebutton to complete the import process.