meta data for this page
- en
Pricing - Markups
To get a good understanding of the way FastManager uses markups, we recommend that you follow all the steps outlined below, starting with creating a “Simple Markup” table, and all the way through until you get to the “Advanced Markup”.
Simple Markup
In a Simple Markup, you would have a single Markup table, with no Qty breaks, and apply that table to an entire catalog (or catalogs)
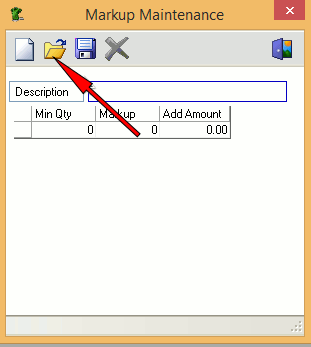
Go to Edit → Markup Maintenance
- Create a new markup table, perhaps called: “Standard Markup”
- On the first row, in the column
Min Qtyenter a0 - On the first row, in the column:
Markupenter a value such as100- This will mean that any item that this Markup Table is applied to, will be marked up by 100%, regardless of the cost of the item, or the number of pieces added to the order
100% markup means that an item which cost you $1, will be sold for $2
- Save the markup table
- Now this Markup Table is available to be used when importing catalogs, or through the options found at:
Edit→Global Item Changes(which we will be looking at toward the end of this article)
Quantity-based Markup
A Quantity-based markup is the same as a simple markup, except that we add more rows to the markup table, as follows:
- If this Markup Table is applied to an item or catalog, then the item/s will have selling prices calculated for each of the various Qty Breaks as indicated in the markup table.
- Meaning that if you have a larger number of items on your order, the effective markup (and therefore the final selling price) will be adjusted according to these quantity breaks
Applying the Markup Tables
Simple or Quantity Based Markup
When Importing Catalogs
On the navigation pane to the left of the main FastManager window, expand the section called Catalogs
- Then click on
Online Catalogs- Select the country and click on Get List
- Check off any catalogs to import then click on Next
- Now simply select the markup to use on the previously selected catalogs from the drop-down selection:
Using Global Item Changes
Go to Edit → Global Item Changes
- Select:
Change Applied Markupand click on Next
- Next to
Catalog =select the catalog for which you want to change the markup (you can also select “All Catalogs”) then click on Filter and click on Next
- From the drop-down selection, select the markup table to apply and then click on Apply
Cost Based Markup
In a Cost Based Markup, we first create a number of different Markup Tables, each of which being intended for use with items at differing Cost Breaks
- For example, you can create a Markup Table which is intended for cheaper goods, such as $2 Tee's, and a seperate Markup Table which is intended for more expensive goods, such as $30 Jackets
- You can give each different a table a specific Name, which would serve to indicate what Cost Bracket it is intended for, like so:
FastManager will examine the item/s in the catalog and, based on the cost, will determine which markup to use to calculate the effective retail price
Applying The Markup Tables
Cost Based Markup
When Importing Catalogs
On the navigation pane to the left of the main FastManager window, expand the section called Catalogs
- Then click on
Online Catalogs- Select the country and click on
Get List - Check off any catalogs to import then click on
Next
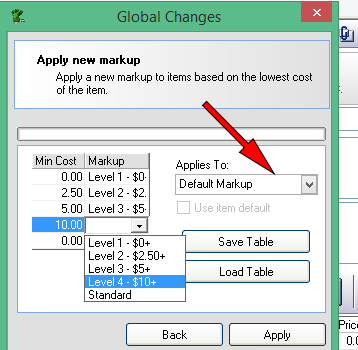
- To use a Cost Based Markup, click on the little
button, then list the markup tables to use at the right-hand side
- Under
Qualifying Amount, enter the cost at which the markup is applicable
- Under
Markup Table, select the Markup Table which will be used for items at that cost-level
Example
| Item Cost = | Use the table: | Explanation: |
|---|---|---|
| $0 or more | 'Level 1 - $0+' | Goods which cost less than $2.50 get this markup |
| $2.50 or more | 'Level 2 - $2.50+' | Goods which cost $2.50 or more get this markup |
| $5 or more | 'Level 3 - $5+' | Goods which cost $5 or more get this markup |
| … and so on … |
Remember that when you actually add goods to your order, the total number of pieces will also help to determine the effective markup, If you have included quantity breaks in each of your markup tables.
Using Global Item Changes
- To use an Advanced or Cost-Based Markup, go to:
Edit -> Global Item Changesand select:Change Markup Based On Cost
- Next to
Catalog =select the catalog for which you want to change the markup (you can also select “All Catalogs”) then click on Filter and click on Next
- Under Min Cost, enter the minimum cost at which the markup is applicable
- Under Markup Table, select the Markup Table which will be used for items at that cost-level
Example
For items which cost ** $0** or more, we will use the table Level 1- $0+
For items which cost ** $2.50** or more, we will switch to using the table: Level 2 - $2.50+
and so on …
Advanced Markups
Advanced Markups refer to the possibility of setting up a different set of Markup Tables for each of a number of different Customer Groups
Edit -> Lists -> Customer Industry.Remember to assign your customers to a Customer Group in their setup at:
Edit -> Customers
First, go to Edit -> Markup Maintenance and create a set of Markup Tables
- This can be a single, Simple Markup table or a Quantity Based Markup table
- You can also create a series of Cost Based markup tables
Once you have prepared all the markup tables you will need,
- Go to
Edit -> Global Item Changesand selectChange Markup Based on Cost, then clickNext
- Select the catalog (or “All Catalogs) from the drop-down then click on
Filterand then click onNext
- On the left hand side, in the
Markupcolumn, you can select just one markup table with a0entered in theMin Costcolumn on the first row
- Or - you can select numerous markup tables with corresponding
Min costvalues, just as you would for a Cost Based Markup
- However, in addition to the above, you can also select a particular Customer Group from the drop-down under
Applies To:
- Click
Apply
Catalog Item Pricing
Once you have setup and applied your markup tables, you can view the resulting Retail Pricing for any given catalog item at: Edit → Catalogs Items
- Click on the yellow Folder icon to search for items
- Then enter any existing
Style Numberand click onSelect
- You can see the markup table in use next to
Default Markup
- You can also switch the Markup Table that will be used by this item. Simply select a different one from the drop-down
You can make changes to the pricing of the item with various options, such as:
- Change from using a markup to
Enter Own Retail And cost
- Using the
Cost Wizardor theRetail Wizardto make bulk adjustments to pricing