meta data for this page
- en
Additional Charges
Additional charges are added to an existing print or embellishment. They are generally not added separately or on their own. And so, because each different print or embellishment can be configure with its own specific configuration, the setup of the additional charges is handled within the actual setup of each individual embellishment price item, which will be found on the various Embellishment Pricelists:
- For more information about the various embelliehment pricelists, click on the appropriate option below:
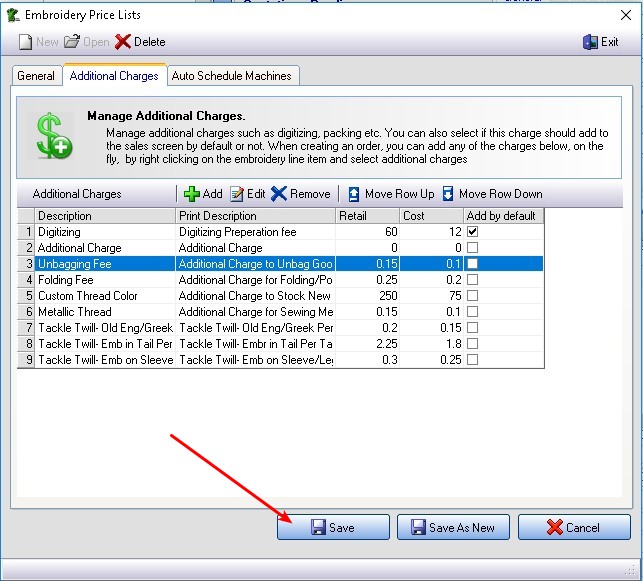
You can add an unlimited number of additional charges such as digitizing, artwork, bagging and special thread colors etc.
Click on the Additional Charges Tab
- To create a new additional charge, click on the
Addbutton - To edit an existing charge, select the charge from the list below, and click on the
Editbutton. - To delete an existing charge, select the charge from the list below, and click on the
Deletebutton.
1.) Defaults (can be overridden on the order)
Select if you want FastManager to add this additional charge to the sales screen by default.
- You can always remove or add it on the fly from the sales screen, by deleting the row, or right clicking on the actual embroidery line item and select
Additional Charges
However
If the additional charge is something that you won't charge on a regular basis then it might be better to add these items on the fly later as it could become time consuming to delete these rows every time.
2.)Basic Settings
Next enter a user friendly menu description.
- This is the description that will display when you add this charge on the fly, by right clicking on the embroidery charge line in your sales screen and select 'Additional Charges'
Then enter the default print description. This is the description that will print on your quotations, work orders and invoices. You can over type this description in the sales screen.
If you are out sourcing this additional charge check the 'Out source to' check box and select a default vendor from the drop down list. FastManager will add this item to your PO wizard if this option is selected.
- This is a default setting - the supplier can be changed on the order or on the PO.
You can have FastManager sync the number of items, by default, with the number of colors or items if you like.
3.) Cost & Selling price
Enter your cost and selling price
The cost has a twofold purpose:
- If you are out-sourcing this service to another vendor then FastManager will use this cost table when generating a PO
- FastManager will also use this cost to calculate the estimated profit on your work order.
4.) Tax settings
Select if the line item should be taxed or not.
Tax 2 will almost always be Non - don't change this unless you have a good reason to do so
5.) Scheduling Options (only relevant if you have the Scheduling module enabled)
If you are using the auto scheduling module, you can select if you want FastManager to automatically create a task or simply add additional time to your machine if this charge is present as a line item in your work order.
Digitizing you may want to create a task for your art department. If this additional charge is
Metallic Thread you may simply want to add an additional 30 seconds per garment to your machine time.
If you are creating an additional task you can also specify when you want FastManager to schedule it.
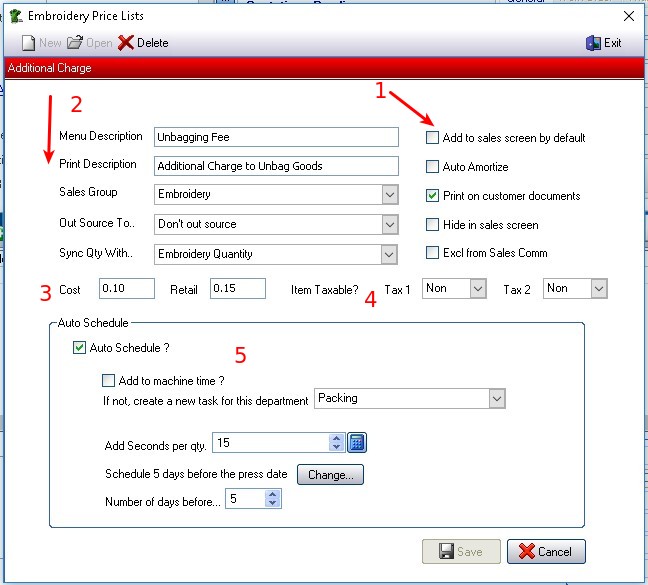
When complete, click on the Save button to commit your changes.
Open any existing item, then simply give it a new name and click on
Save As New
!!! tip In each embellishment pricelist, create ONE embellishment price, which includes a complete list of additional charges, then use the Save As New button to make a COPY of that embellishment for editing into a new item.
This will save you re-entering all the same additional charges multiple times.
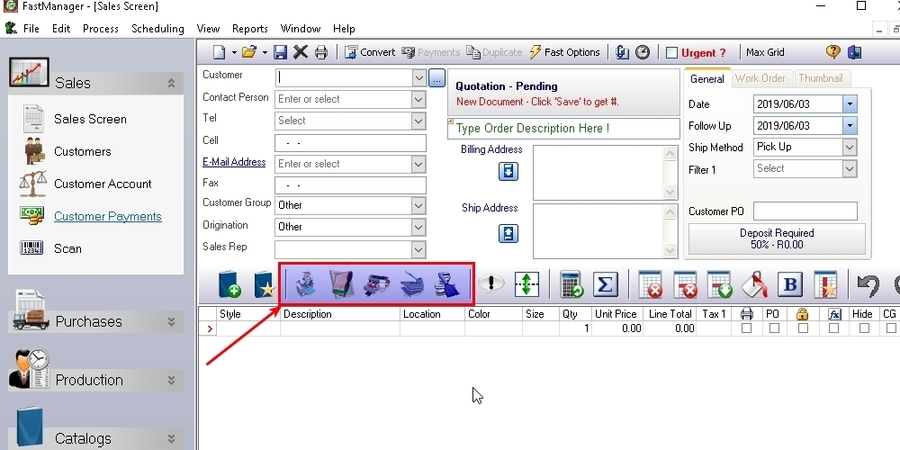
- Existing additional charges can be accessed on the Sales Screen:
- Right-click * on your embellishment row (“Embroidery” in the below example) and go the
Additional Chargesoption on the context menu: