meta data for this page
- en
The Sales Screen: Basic Features
Adding A customer on the fly
When entering a new quotation, work order or invoice you do not need to select the customer from the drop down list.
- Instead you can simply enter your customer's information, and FastManager will create the customer on the fly for you in the background when you save the quote.
- FastManager will use as much of the information that it can obtain from the sales screen to create the customer. Such as:
- Shipping & Billing Address
- Contact name, telephone and email
The Convert Button
The Convert button will display a menu with options for changing the status of the document.
- The menu is dynamic and therefore based on the current status of the document.
- You will have the following option if the current status is Quotation:
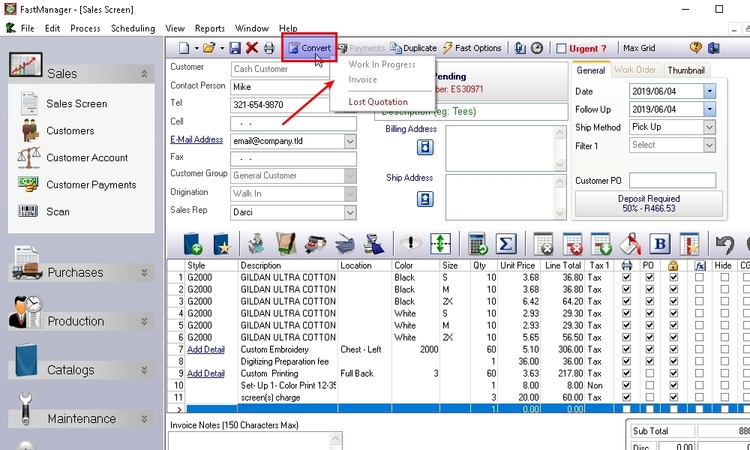
You can convert a Pending Quote to a Work Order or go straight to Invoice.
- You can also mark the quotation as
Lost.
Many times in real life, lost quotations becomes orders.
- You can convert a
Lost Quotationback to aPending Quotationor go directly to Invoice or Work Order.
- The only 2 options are to cancel the work order or invoice it.
- The reason for this is integrity. There are many other associated records that need to be considered which is not possible when it is a quotation.
- You can, however, generate a new quotation from the contents of a Cancelled Work Order using the
Duplicatebutton.
A Canceled Work Order can be converted back to an In-Progress Work Order
- however, you will need to re-schedule the entire order.
Once you have created and invoice you can only change the status to a voided invoice.
- You can also select to 'Edit' the invoice, which will temporarily unlock the invoice so that you can make changes to it.
- You can also toggle the 'sent to QuickBooks' status of the invoice.

Voiding an invoice will not only remove the transaction from the customer's register, which will subsequently reduce your customer's balance, it will also disable the Convert button.
- Once you have voided an invoice you cannot go back. If you need to re-create the invoice, use the
Duplicatebutton.
Remark Lines
Similar to the old quote pad system you can easily add remark lines.
- Simply click on the
Remark Linebutton and select one of your pre-defined remark lines or you can choose to insert a blank remark line.
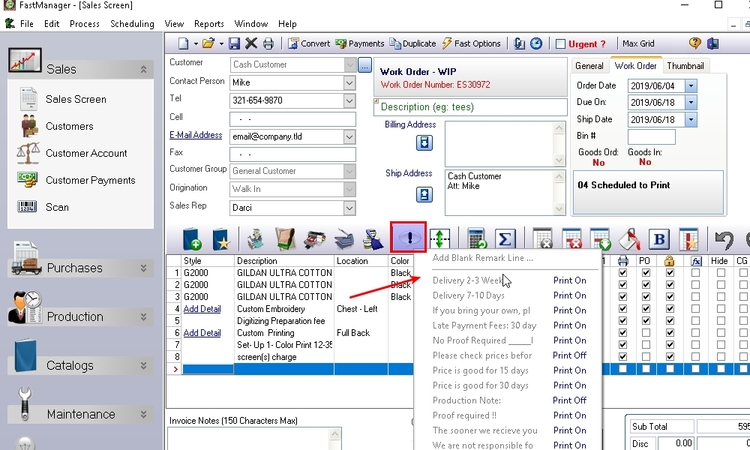
Many smaller companies will only use the remark line system instead of capturing all the design detail.
- This saves them time and also keeps the program very simple and easy to use.
Select the row above where you want to insert the remark line, then hold down you
SHIFT key while clicking on the remark line button.
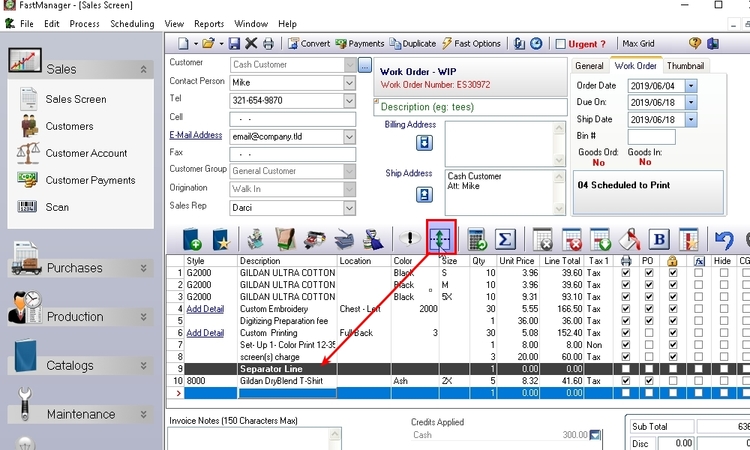
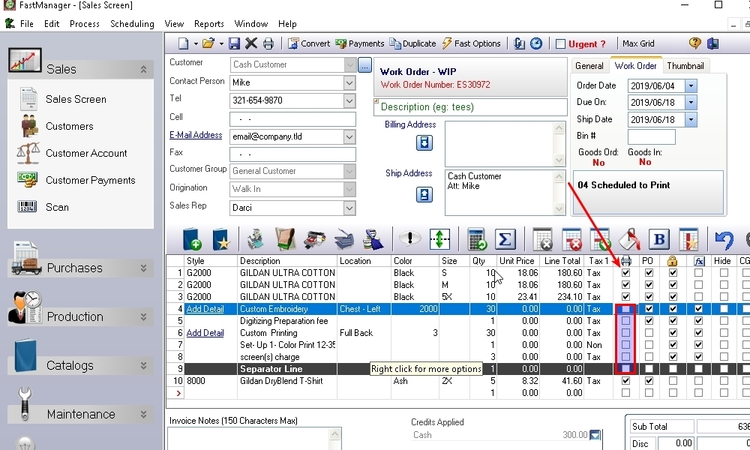
Separator Lines
The separator line will divide a work order in to sub sections.
This action has multiple implications:
- If you select to synchronize your embellishment quantity with that of the number of items, then FastManager will only count the number of items in the same separator group.
- For example. If you have an order for 50 Tees and 50 Caps you would want the 'Screen Printing' to only count 50 items as you are not printing on the caps, and likewise you would like the 'Embroidery' to only count to 50 as you will only be embroidering onto 50 caps.
- If you select to amortize the embellishment charges into the garment, then FastManager will only amortize the charges into the items that belongs to the same separator group.
- FastManager will also break down the 'Design Detail' report based on the separator group, so that each set of garments are shown with its embellishment.
- This way you cannot accidentaly print the wrong art on the wrong garments.
- The separator line basically divides a work order into sub orders.
To add a separator line, click on the Add Separator Line button in the sales screen. FastManager will automatically add the line to the bottom of you sales screen. You can then drag it to another position.
SHIFT key while you click on the button.
Amortization
One of the major benefits in FastManager compared to any other product, including generic account software, is that you can choose if you want to amortize your services prices into the garment price.
- FastManager is smart enough to remember what the embellishment costs are, so FastManager will still show the correct breakdown of sales when printing a sales analysis report, even though the prices are consolidated into your garments.
Once amortized you can still override the selling price, and FastManager will then adjust the garment price to accommodate a rounded total.
FastManager will only amortize into items that are flagged as Included in item count within that separator group.
- An item flagged as Included in item count cannot be amortized into other items.
To amortize a line item into other items, check the Amortization box in that row.
- FastManager will automatically change the unit price to zero as well as divide the total price by the number of items in that separator group, and add it to each item.
Locking Prices
As we said before FastManager is basically a sophisticated lookup system, saving you all the time and hassle of calculating or looking up costs and prices.
- If you don't want FastManager to calculate or lookup a price on a specific line item then you can lock the line item.
- You will see a padlock icon above that column. See below.
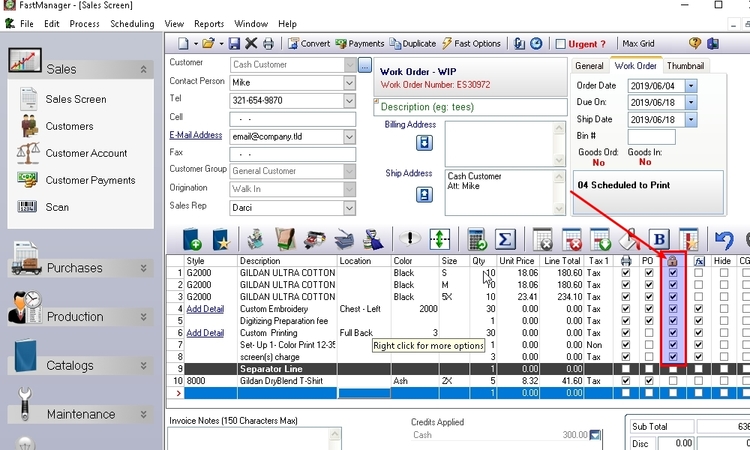
- As soon as you unlock the row then FastManager will update the line price of that item from the database again.
- in other words, it assumes that you want to dictate the price instead of getting it from the database.
Printing Customer Rows on Documents
You can select if you want line items to print on customer documents or not.
- For example, if you add a remark line that is intended for one of your production staff but do not want your customer to see that on his/her quotations, sales order confirmation or invoices - then you need to uncheck the print box for the line item
- for example, you can amortize the amount from the row you don't want to print into another item that you do intend to print.
- The reason for this is: if you print an invoice that the invoice totals should match up if you add up all the line items.
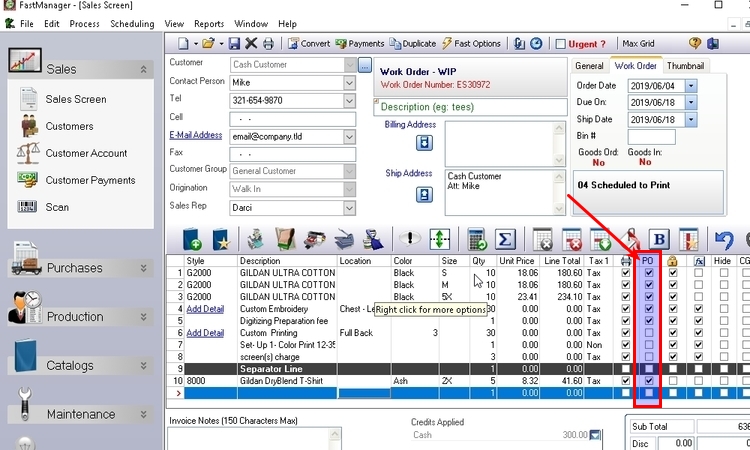
Add Items to the PO wizard
FastManager will automatically add any items from your order to the PO Wizard, if they have that option enabled on the work order (WIP)
Imported vendor catalogs will have this option enabled by default for all items
and you can set the option to enabled or not in your own custom items, in their setup on the catalog item edit screen
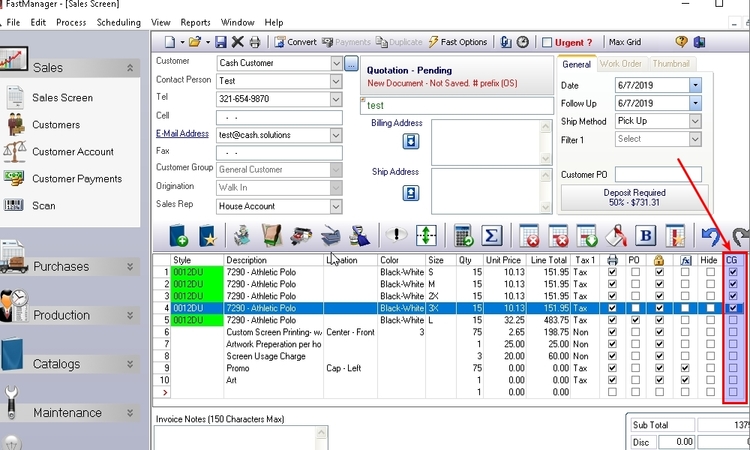
Customer Goods
If a customer is supplying your their goods you can tell FastManager that the items are Customer Goods
- FastManager will then set the retail price as well as the costs to zero and you can then check in their goods from the
Job Board. - To mark items as
Customer Goodsensure that the check box under theCGcolumn (which stands for customer goods) is checked.
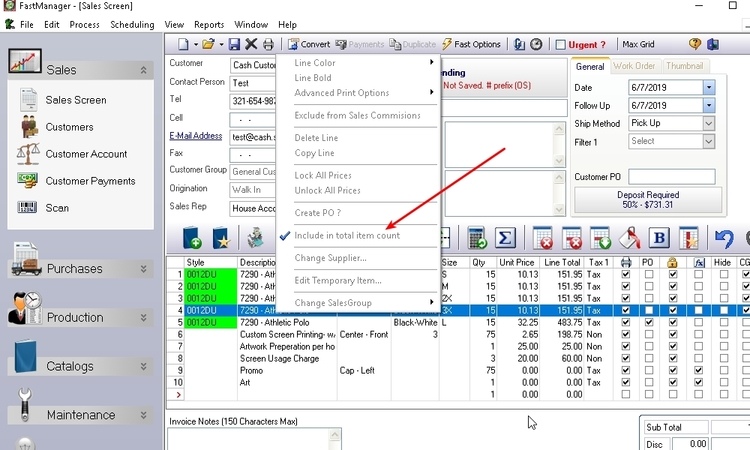
Adding Items To The Item Count
FastManager counts the number of items you have in 3 instances:
- When trying to determine the correct markup, as it is based on the number of items that your customer orders.
- When amortizing embellishment costs into garment costs (FastManager needs to know how many items there are per separator group).
- When synchronizing service charges (FastManager needs to count the number of items per separator group),
- You may not want FastManager to a count a line item as part of the number of items.
For example, you would not want FastManager to amortize your embellishment costs into a line item called Shipping.
If you want to exclude an item from the total item count right-click on the line item and uncheck: Include in total item count
Synchronizing Service Counts
You can select to synchronize the number of embellishments with the number of items within a separator group.
- For Example: You can have FastManager automatically update the number of prints as you change the number of garments.
You can set each price list up to synchronize by default when creating the various price lists
You can toggle this setting by right-clicking on the service line and selecting Sync Qty With Item Count
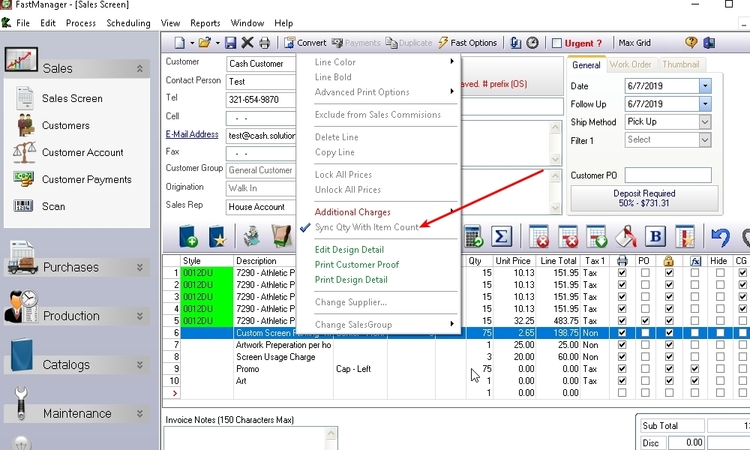
FastManager will also automatically turn the synchronization off when you overtype the service quantity assuming that you want to enter the quantity manually.
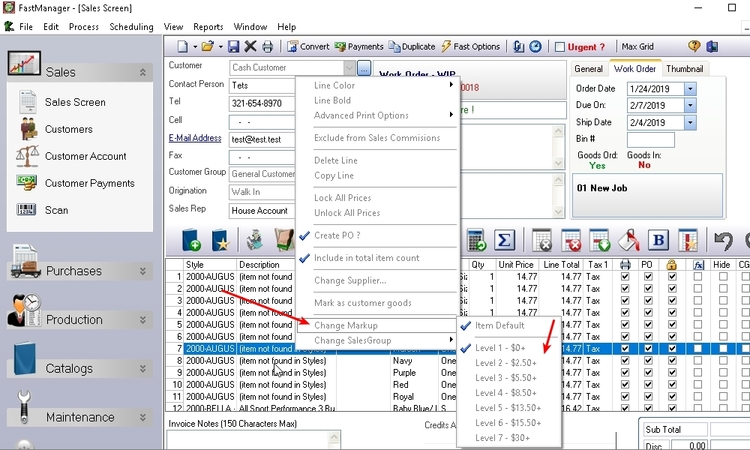
Changing item Markup on the fly
You can change the markup assigned to a catalog item for a single line item at a time for a particular order.
This will not change the default markup assigned in the master file.
- right-click on the catalog item, Select
Change Markupand select the new markup that you want to apply to that item (for this order only)
Changing The Required Deposit on the Fly
FastManager will automatically set the deposit required percentage to that of the selected customer.
However if you are entering a new customer (Creating a customer on the fly), then FastManager will default to what you have selected in the company preferences.
To change deposit percentage for a particular order, simply click on the deposit percentage label and enter a new percentage
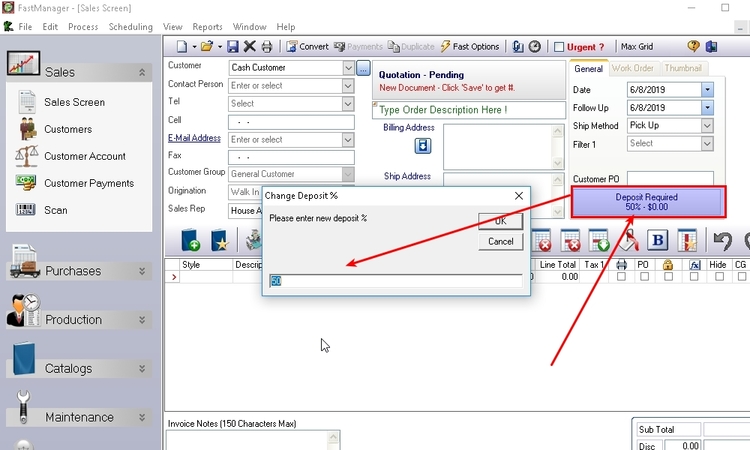
For example:
- By default ACME Company Inc will pay a 0% deposit as they are a good customer.
- However they placed a very large order with your company and to help fund the purchases you require them to pay a 30% deposit on this one order only.
- You can simply click on the
Depositlabel and change it for just this order.
Changing the Tax Percentage
FastManager will automatically change the tax percentage (visible at the lower-right of the Sales Screen) to that of the selected customer.
- However if you are entering a new customer (Creating a customer on the fly), then FastManager will default to what you have selected in the company preferences.
To change tax type for a particular order, simply click on any of the tax percentages below and select a new tax type.
The Order Prefix
FastManager will automatically add a prefix to your WO number.
- The purpose behind this is that you can identify the range of embellishments that are contained in that order by just looking at the WO number.
- FastManager will add a single instance of each of the following letters if the work order contains one or more of the associated embellishment:
| Prefix | Meaning |
|---|---|
| S | Screen Printing |
| E | Embroidery |
| G | Garment Printing |
| H | Heat Pressing |
| O | Other - Generic Embellishment |
If you see a work order number ES10144 then you know immediately that this order will have to go through the Embroidery as well as the Screenprinting departments without even opening the order.
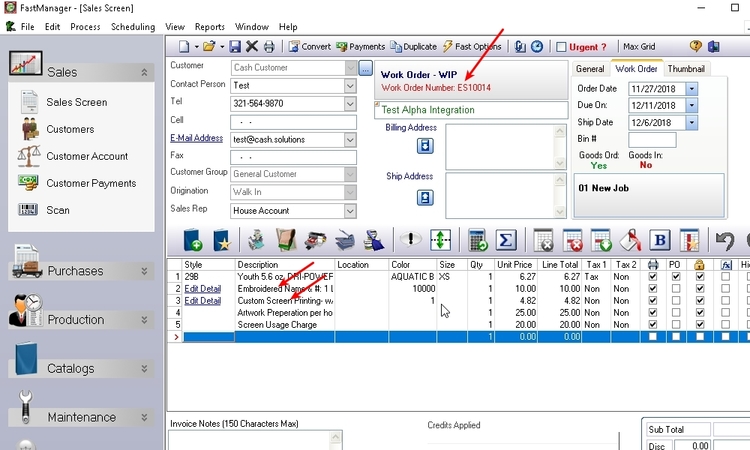
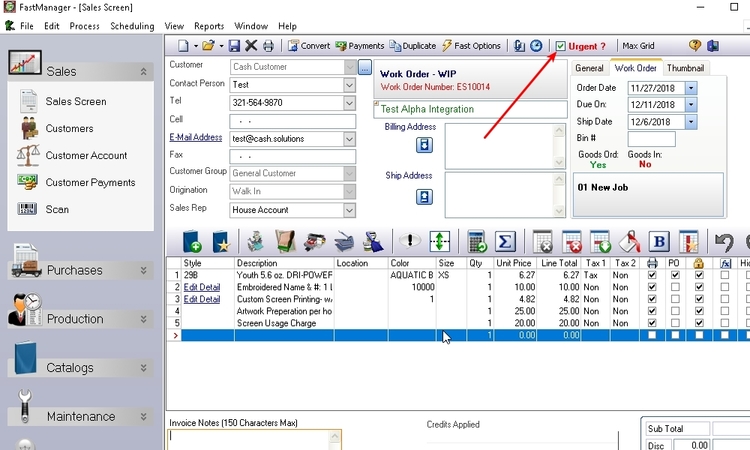
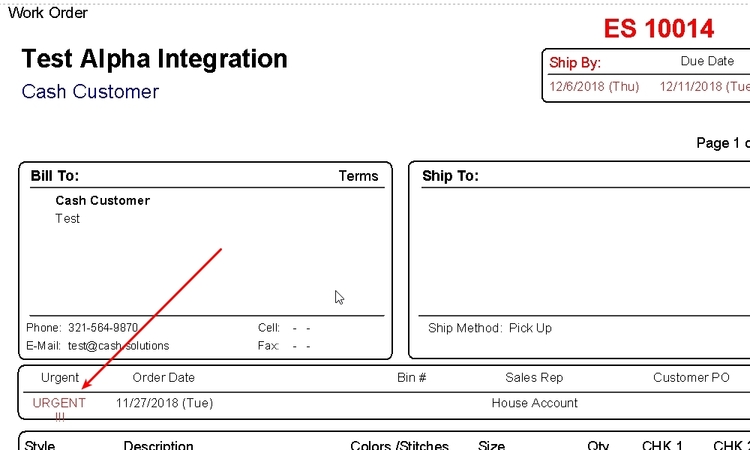
Urgent Orders
You can select to mark an order as urgent.
- This basically means that it is an event date and that you cannot negotiate that date.
- Also the urgent status would appear on the work order print outs as well as when using the PO wizard, you will see which orders are urgent and you need to order the goods.
- Check the urgent check box at the top of the sales screen if the order is urgent.
- See the work order status on the WO print out
- See the urgent status indicated on the Job Board
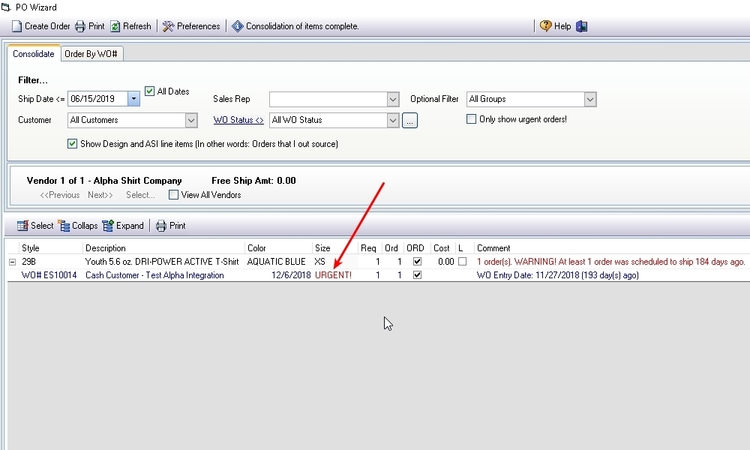
- See urgent status in the PO Wizard, when ordering goods.
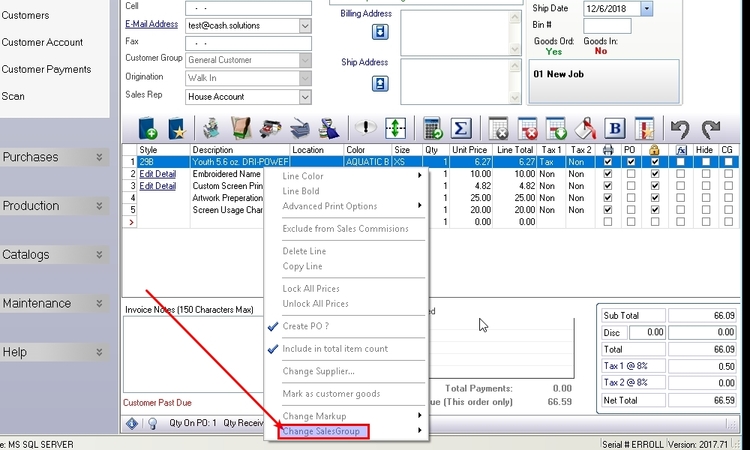
Sales Group
Each line item in the sales screen is linked to a sales group.
You can configure or change the associated sales group for a given Pricing item from it's maintenance screen.
- Click Here to review the setup options and requirements for Items, Embellishments, Additional Charges and Miscellaneous Charges
To override (change) the Sales Group on-the-fly on the Sales Screen, right-click on any item row and go to Change Sales Group in the context menu:
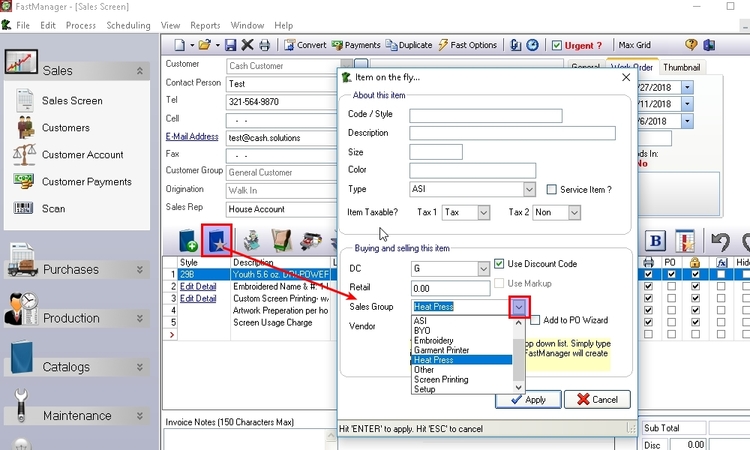
Remember to select the correct Sales Group when creating Temporary Items:
The sales group will also determine which item code is selected when exporting the line item to QuickBooks.