meta data for this page
- en
Screen Printing Price List
Your Screenprinting pricelist can consist of any number of Screenprinting items, each with a selling price grid and other options preconfigured for different scenarios.
- The way a screenprinting price item is configured will not only determine the ultimate price but also how it will impact on your assigned tasks if you have the Auto Scheduling module turned on.
- For example:
- FastManager could schedule tasks and calculate times differently if you selected a price which includes a 'Flash' charge (and associated Task) vs one that has no Flash charge
Create a Screen Printing Item
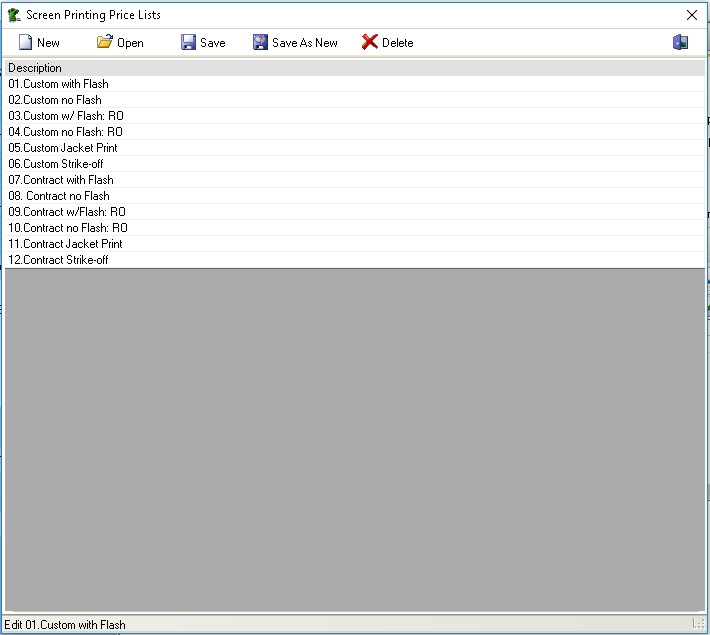
To create or edit an existing item, select Screen Printing Prices from the Edit menu.
To edit or delete an existing price list you need to open the price list first by clicking on the Open button.
To create a new price list, click on the New button.
- Enter a description
- This is the description that will appear under the
Screenprinticon on the Sales Screen
- Select a sales group
- For more information about sales groups, see: Sales Groups
- Specify the maximum number of colors permitted for this particular screen print item
- Select a Service Group
- Service Groups allow you to sort and organise the items on your pricelist as it appears on the Sales Screen.
- For more information, see:Service Groups
You will also see these 4 tabs:
- General
- Your Cost
- Your Selling Price
- Auto-schedule Presses
General Tab
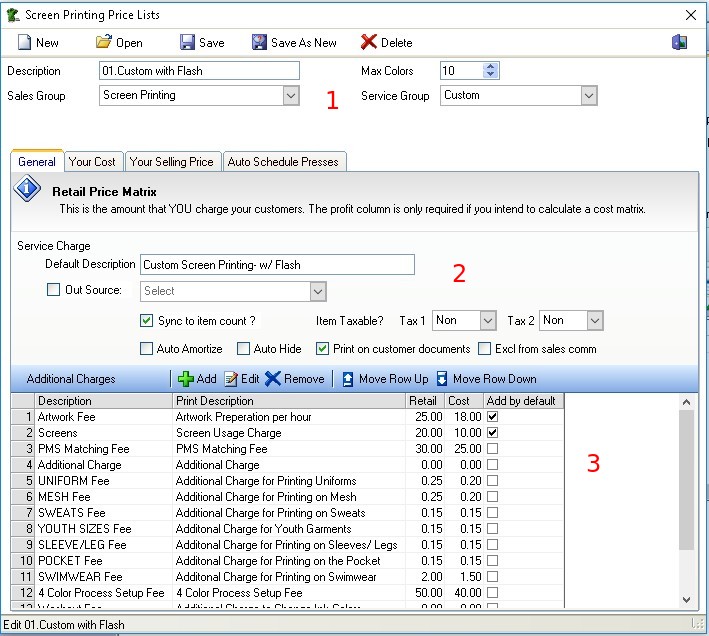
1.) Basics
Description
- First enter a user friendly description of the price list so you can easily identify it. For example: 'Contract No Flash'
- This description will display as the caption in the pop-up menu when you add screen printing in the sales screen
Max Colors
- Next enter the maximum number of colors that you can print when you select this price list.
Sales Group
- Assign this item to a Sales group.
Service Group
- Service Groups allow you to organise your Screenprinting items into logical groups or categories. For more information see: Service Groups
2.) Defaults
Default Description
- Enter the default print description. This is the default description that will print on your quotations, work orders and invoices. You can always overtype it on the fly.
Outsource
- If you are going to out source this work to another screen printer, check the
Outsourcecheck box (and optionally select the default supplier).
Sync to item count
- Select if you want the screenprint quantity to synchronize with item quantity on the order, by default.
Item Taxable?
- Select if this line item is taxable or not. (Tax 2 will almost always be Non, only change this if you have a good reason)
Auto Amortize / Auto Hide / Print
- You can have this screenprint automatically amortize with the physical goods on the order.
The screenprint has been added separately, but it does not actually show up on the printed Quotation.
Exclude from sales commissions
- check the box to make sure that this item is not included in any sales commission reports
3.) Additional Charges
You can add an unlimited number of additional charges such as screens, artwork, bagging and PMS color match etc.
- To create a new additional charge, click on the
Addbutton. - To edit an existing charge, select the charge from the list below, and click on the
Editbutton. - To delete an existing charge, select the charge from the list below, and click on the
Deletebutton.
Once you click on the Edit or Add button you will see the following screen:
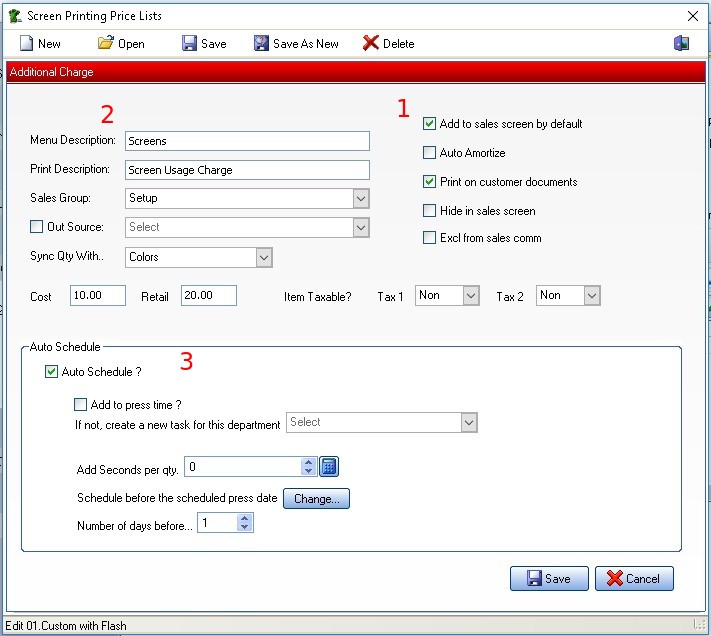
1.) Defaults
Add by default
- Select if you want FastManager to add this additional charge to the sales screen by default.
- You can always remove or add it on the fly from the sales screen, by deleting the row, or right clicking on the actual screen printing line item and selecting:
Additional Charges
If the additional charge is something that you won't charge on a regular basis then it might be better to add these items on the fly later as it could become time consuming to delete these rows every time.
Auto Amortize / Auto Hide / Print
- You can have this additional charge automatically amortize with the physical goods on the order.
Exclude from sales commissions
- check the box to make sure that this item is not included in any sales commission reports
2.) Basic Settings
Menu Description
- This is the description that will display when you add this charge on the fly, by right clicking on the screen printing charge line in your sales screen and selecting
Additional Charges.
Default print description
- This is the description that will print on your quotations, work orders and invoices.
- You can overwrite this description in the sales screen.
Sales Group
- select a sales group for this charge.
- this also determines which item code the Integrator will select when exporting the invoice to QuickBooks.
Outsource
- If you are outsourcing this additional charge check the
Out source tocheck box and (optionally) select a default vendor from the drop down list.- FastManager will add this item to your PO wizard if this option is selected.
- This is a default setting and can be changed on the fly.
Sync Qty With …
- Select if the quantity of this additional charge item should synchronise with the quantity of:
- items on the order
- colors on the print
- number of prints being done
- Don't sync at all

You would typically want to synchronize the number of screens with the number of colors.
If the additional charge was bagging you may want to synchronize it with the number of items.
Cost / Retail / Tax
- Enter your cost and selling price and select if the line item should be taxed or not. (Tax 2 will almost always be Non, don't change this unless you have a good reason)
- If you are out sourcing this service to another vendor then FastManager will use this cost table when generating a Purchase Order
- FastManager will also use this cost to calculate the final profit on your work order.
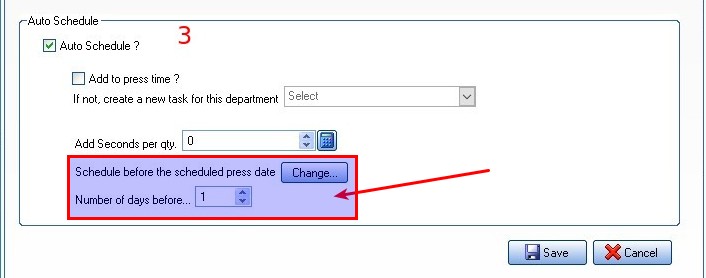
3.) Auto Schedule
(only relevant if you have the Scheduling module enabled)
If you are using the auto scheduling module, you can select if you want FastManager to automatically create a task or simply add additional time to your machine if this charge is present as a line item in your work order.
Screens you may want to create a task for your screen making department. If this additional charge is
Special Ink you may simply want to add an additional 30 seconds per garment to your machine time.
If you are creating an additional task you can also specify when you want FastManager to schedule it.
Click on Save to save this additional charge.
Simply give it a new name and then click on
Save As New
Your Cost
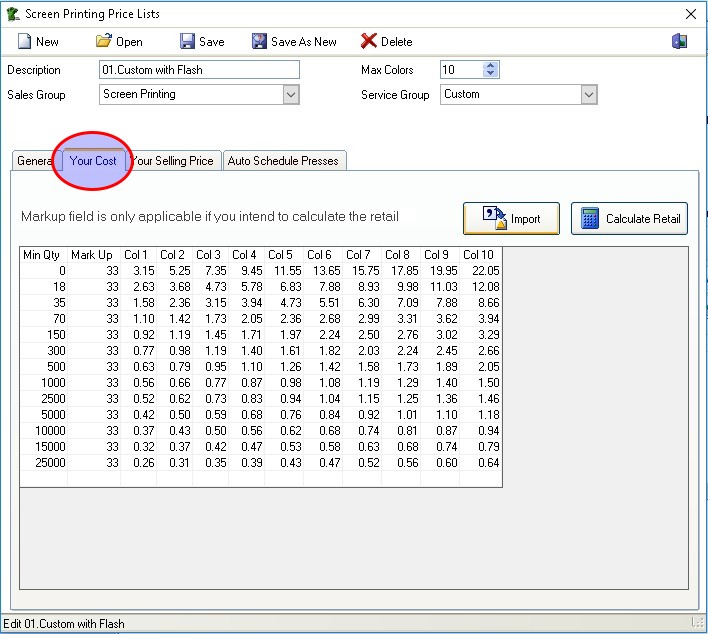
Col1 ; Col2 ; and so on, actually represent: 1 Color ; 2 Colors ; etc … The pricing entered under
Col1 indicates the cost for a 1 color print The pricing entered under
Col2 indicates the cost for a 2 color print .. and so on ..
The cost tab has two purposes:
- If you are outsourcing this job to another screen printer then FastManager will use the cost table to lookup a unit cost when generating a PO
- FastManager will also use this cost to calculate the final profit on your work order.
You can select if you want FastManager to calculate a retail table for you, instead of inputting your own.
- To do this, enter a markup (expressed as a percentage) in the
Mark Upcolumn and click onCalculate Retail.
Your Selling Price
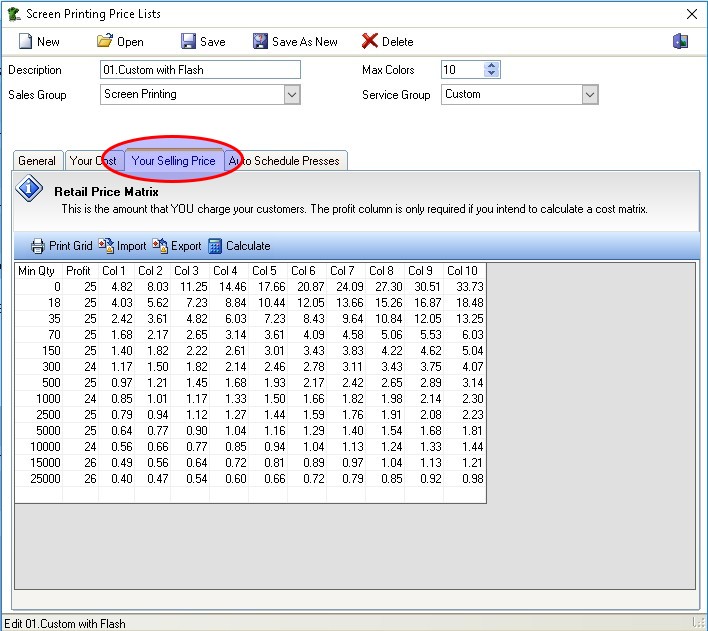
Col1 ; Col2 ; and so on, actually represent: 1 Color ; 2 Colors ; etc … The pricing entered under
Col1 indicates the selling price for a 1 color print The pricing entered under
Col2 indicates the selling price for a 2 color print .. and so on ..
FastManager will use this table to lookup your selling price in the sales screen.
Profit column (expressed as a percentage).
Export button to export the grid to a CSV spreadsheet that you can edit in LibreOffice Calc or MSExcel, Once saved, you can then
Import that CSV spreadsheet back into the Selling Price grid. (yes you can also import into the grid on the cost tab)
Auto Schedule Presses
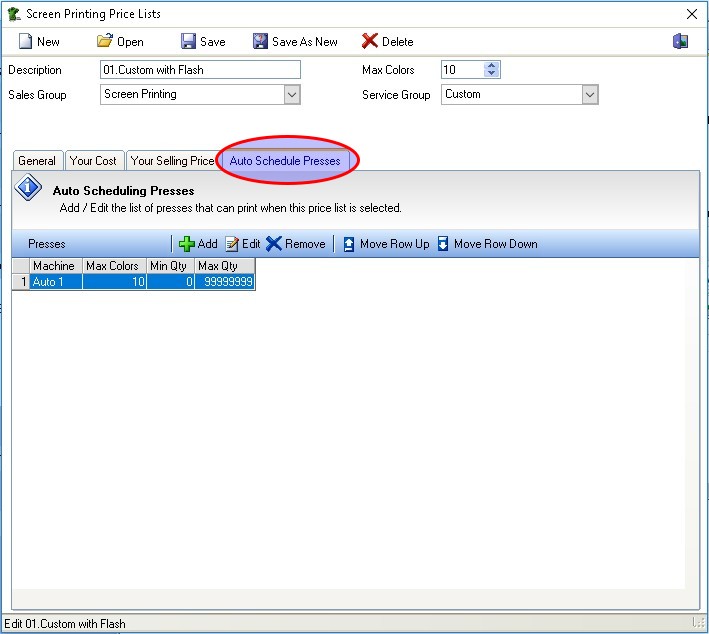
Here you will tell FastManager which of your screenprinting machines are capable of this particular screen print.
- For example:
- If one of your screen printing presses does not have flashing capabilities and this price list is called 'Printing with flash' then you don't want to include that machine here
For example:
you would not want to run more than, say, 250 pieces on a manual press if you have an automatic press in your shop.
To edit an existing machine, select the machine from the list below, and click on the Edit button.
To delete an existing machine, select the machine from the list below, and click on the Delete button
To add a new machine, click on Add
- You should see this screen:
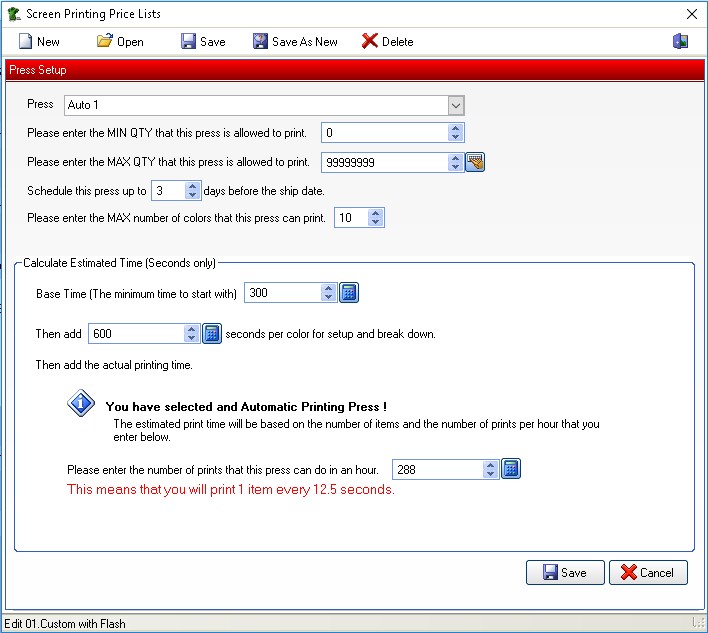
Press
From the drop down list select a machine to include in the list of machines that can accommodate this particular screenprint.
Enter the min qty that this press is allowed to run. FastManager will automatically eliminate this machine when trying to schedule this job if the min qty is not met.
Enter the max qty that this press is allowed to run. FastManager will automatically eliminate this machine when trying to schedule this job if the max number of pieces is exceeded.
Select the minimum number of days prior to the Ship Date you want FastManager to search for an open slot to run this machine
If it cannot find an open spot then it will automatically try the day before and so one.
The number of days it will try is based on the number of days you enter in here.
The higher the number the higher the probability is that FastManager will see the job as do-able.
However you will have less time to complete the art and get the goods in.
3 is normally a good number.
Select the maximum number of colors that you can print on this machine.
However FastManager links this capability directly to this price list.
For Example:
you can print fewer colors on the same machine if the price list is 'Print with Flash' than if it was 'Print without flash' (because the former setup reserves one or 2 heads for flashing)
Calculating Production Time
We now need to tell FastManager how it is going to calculate production time for his machine.
For example:
if this item is: 'Printing with flash' then you will have different times than what you might have configure for a different item called:'Printing without flash'.
Be conservative - You can always decrease your times later if you see that you are under estimating your production capabilities.
Base Time
This would be the minimum time that you want to schedule a job for and FastManager will start with the base time.
This would basically include how long it takes to get the shirts, screens and ink to the machine.
This does NOT include setup and break down time.
Next we need to enter the setup and break down time.
This time is calculates per color. Thus FastManager will multiply the time entered here with the number of colors, and then add that total to the base time.
For example:
If you want to enter 7 minutes for the base time then you would click on the calculator button and select 5 min and then click on the calculator button again and select 2 min.
Now select your print time.
If the machine you selected is an automatic press then you need to select your index speed e.g. 600 pieces per hour.
If you selected a manual press then you need to tell FastManager how many single color prints you can produce in a hour.
- Click on the Save button when you are done.